Friday, July 31, 2009

July Finishes

I have 3 finishes this month!  

I almost had another but, alas, I still need one more coat of paint to finish the back deck...

In the middle I have another mini quilt finished.  This is a rail fence made from 30's prints.

On each side are sock sacks.  I found the tutorial for them here.  They were quick and easy to make.  Even with the zippered front pockets!


As we head into the home stretch, I hope everyone else is still inspired to finish more with the OPAM challenge.  I'm really look forward to seeing what everyone else is doing each month.

Sunday, July 26, 2009

Quilty Happenings

A couple of weeks ago now, some friends and I went to a little outdoor quilt show that is put on by Lorraine Stagness every two years.  Here are their pictures.

Here are some of the pictures I took.

I love blue and yellow.  I also love quilts with movement.


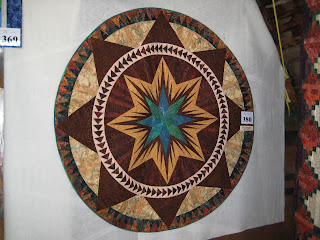
This one is just stunning.  Plus I really like the look of flying geese going around in a circle.

Every time I see chickens I can't help but think of chookyblue and take a picture.  See the mice in the barn?

Isn't the applique stunning?  I have a quilts like this in my future.  (At some point after Nearly Insane and Dear Jane are done. :)

This is another one with great movement.  Plus, I now notice pinwheels everywhere.  (We have a quilter in our guild that is pinwheel crazy)

This one is just so bright and I love all the spiky bits.

This one, I just couldn't resist the colours.  I love all of these more folk arty colours together.

I love how they used the piping and created the wavy design.

I'm just a sucker for optical illusions in quilting.

I hope you enjoyed the pictures of the show.  Can you believe that all these quilts are made by one lady and her two sisters?  And that they put on a show (about 200 quilts) every two years?

Thursday, July 16, 2009

A Parliament of Owls

A friend of mine very kindly reminded me that I'd yet to post about the owls.  

For our spring retreat we usually make a take-away.  It's usually something small and quick to make so we'll always have a finish for the weekend.

This spring we made Owls.  We used the Tutowlrial given by Moonstitches.

Here is a picture of Owloysious and his possie.  Aren't they adorable?!


My brother says that they're members of the Owl-Qaeda but I think we all know that he's wrong!

Sunday, July 5, 2009

Building Blocks - Fast Flying Geese


I've been thinking of doing a series of building blocks type tutorials for a while now.

I'll be doing mini-tutorials on different types of blocks that are typically pieces in larger more complex blocks.

This block is the flying geese block. Flying goose?

This method is great because it has no waste. It can be problematic if you don't want to make flying geese in multiples of 4.


Note: A and B are the finished measurements.

For the large middle triangle (Red in the picture below) you'll want to cut 1 square: B + 1-1/4" by B + 1-1/4".

For the outer smaller outer triangles (White with red hearts in the picture below) you'll want to cut 4 squares: A + 7/8" by A + 7/8".


On the smaller squares, draw a line across the diagonal.


Lay out two of your smaller squares on top of the larger square as shown in the picture below.

Sew 1/4" away from the line. Do this on both sides of the line.

Cut along the line to split the block.


Press towards the small triangles. I love how this step looks like hearts.

On each side, place the remaining two squares as shown in the picture below.
  

Again, sew 1/4" away from the line on both sides of the line.


Cut along the line to split the blocks. Press towards the small outer triangles.

Here are your 4 flying geese ready for trimming.

Building Blocks - 9-patch


I've been thinking of doing a series of building blocks type tutorials for a while now.  

I'll be doing mini-tutorials on different types of blocks that are typically pieces in larger more complex blocks.

This block is the 9-patch.  I'm starting off with smaller pieced blocks, but I'm sure you can imagine this as just plain fabric.

If you're cutting pieces for the block, you'd cut each piece the finished size plus 1/2".

Here are your 9 pieces all laid out and ready to go.


First I sew the pieces of the outer column to the middle column.


Pressing is the key to a successful 9-patch.  I make sure that the pressing on the middle row goes in the opposite direction of the upper and lower rows.  This way you can butt your seams together and get nicer corners.  Usually I press towards the dark if I'm making a plain 9-patch.  If it's a piece 9-patch like this one, I look at the seams.  I press towards the least amount of seaming to help the block lye flatter.  I'm not sure if you can see the pressing in the block below.

Now repeat with the remaining column.  Once again paying attention to how you press your seams.

Now sew one row to the middle row.  For pressing, my first consideration is what am I sewing the block to.  Do I need to make sure the seams work for this?  Otherwise I'll press towards the side that has the least amount of seams or the most dark pieces.

Once you've attached the last row.  Press following the considerations above.  Then you've got your 9-patch!

Building Blocks - Half Square Triangles


I've been thinking of doing a series of building blocks type tutorials for a while now.  

I'll be doing mini-tutorials on different types of blocks that are typically pieces in larger more complex blocks.

This is the half square triangle.

Cut one square of your light "finished square" + 1 inch by "finished square" + 1 inch.

Cut one square of your dark with the same dimensions.

If you do not like trimming your squares make the dimensions for your squares "finished square" + 7/8".

On your light fabric, draw a line along the diagonal.


Line your squares up for sewing, right sides together.

Sew 1/4" away from your drawn line.  On both sides of the line.

This is what it will look like when you've finished your sewing.  Cut along your drawn line to create two blocks.

Press towards the dark.  Here is your block, untrimmed.

Here is the half square triangle, trimmed.

Building Blocks - Square-in-a-Square II

I've been thinking of doing a series of building blocks type tutorials for a while now.  

Cut your centre diamond square (the square-in-a-square block in the picture below) C + 1/2" by C + 1/2".
For the triangles (White with heart fabric below) I cut two squares B + 1" by B + 1".  I prefer to trim my blocks when they're finished.  It makes the next steps easier.  If you're a wonderful sewer and don't want to trim then cut your squares B + 7/8" by B + 7/8".


Sew two of the triangles on opposite sides with a 1/4" seam allowance.

If I am sewing anything with points, like this block, I'll sew it upside down.  (Like the picture below)  You can see a little X in the seam below.  If you sew just one thread into the seam allowance beside that X, you'll end up with perfect points without needing to pin.

Here is a close-up of the X.


And here is the point you end up with.  All without needing to pin.  (Yes, I'm lazy.  I'll avoid extra steps wherever possible.)

Anyways, back to the block.  Press towards the outer triangles regardless of whether or not they're the lighter colour and trim the dog ears.

Now, repeat for the other sides.  Here are the triangles sewn with a 1/4" seam.

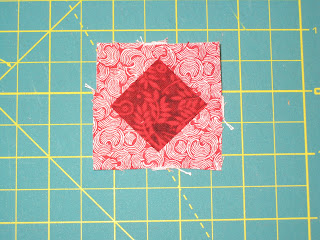
Here is the square-in-a-square - untrimmed.

And here it is trimmed.


I'll be doing mini-tutorials on different types of blocks that are typically pieces in larger more complex blocks.

I'm starting off with the Square-in-a-Square.  There are two ways to make this one.  This second one I call the triangles method.  (If anyone knows the real name, please let me know.)

This is the one I use if "C" works out to be a multiple of 1/8" or if the centre diamond is a block.

Building Blocks - Square-in-a-Square I

I've been thinking of doing a series of building blocks type tutorials for a while now.  

I'll be doing mini-tutorials on different types of blocks that are typically pieces in larger more complex blocks.

I'm starting off with the Square-in-a-Square.  There are two ways to make this one.  The first one I call the squares method.  (If anyone knows the real name, please let me know.)

I generally use this method if the measurement "C" below does not work out to an 1/8" measurement.  It is a little wasteful with fabric, but has its uses.  The line diagram below shows a square-in-a-square block with the lines being the finished size.

For the inner diamond, (Dark red in the picture below) cut a square that is A + 1/2" by A + 1/2".

For the outer edges, (Lighter red in the picture below) cut 4 squares that are B + 1/2" by B + 1/2".

On the four smaller squares, draw a line diagonally on the squares.  This will be your sewing line.

Place two squares on opposite sides (see the picture below) and sew along the drawn lines.  If you can, sew one thread beside the line towards the outer edge.  This helps to give you a little room when trimming the finished block and makes your points sharper.


Take your ruler and rotary cutter and trim 1/4" from your sewing line.
Then press.  I press towards the outside, even if the outer triangles are the lighter fabric.  This helps make the block lay flatter.

Repeat this for the other two sides.

Once again, trim leaving a 1/4" seam

Again, press towards the outside, regardless of your colours.  And here you have a completed square-in-a-square block using the squares method.